Mother’s Refrigerator Rolls – Soft, Fluffy, and Perfectly Golden
There’s something magical about the comforting aroma of homemade bread baking in the oven — especially when it’s a cherished family recipe like Mother’s Refrigerator Rolls. These soft, buttery rolls have been passed down for generations, beloved for their tender crumb and rich, comforting flavor. Whether served alongside Sunday dinner, during the holidays, or as a simple treat with butter and jam, these rolls are pure nostalgia on a plate.
Unlike many bread recipes, this one offers the convenience of preparing the dough ahead of time. The refrigerator method allows you to mix, let it rise, and chill the dough, giving you flexibility to bake fresh rolls whenever you need them. You can make the dough at night and bake in the morning, or prepare it days in advance for a big family meal.
Let’s dive into how to make these golden, fluffy rolls that will make your kitchen smell like home.
Ingredients
- 2 packages active dry yeast
- 1 large egg, beaten with a fork
- ¾ teaspoon salt
- ½ cup plus 1 tablespoon granulated sugar
- ½ cup warm water (not too hot)
- ½ cup shortening (Crisco or lard)
- 2 cups warm water (not hot)
- 6 cups plain all-purpose flour (Martha White or White Lily bread flour recommended)
- 2 sticks margarine or butter (for dipping and brushing)
Step-by-Step Instructions
Step 1: Activate the Yeast
In a small bowl, combine the ½ cup of warm water and yeast with a pinch of sugar. Let it stand for about 5–10 minutes, until the mixture becomes frothy and bubbly. This step ensures your yeast is alive and ready to give the dough a good rise.
Step 2: Prepare the Dough Base
In a large mixing bowl, combine the shortening, salt, and sugar. Pour in the 2 cups of warm water and stir until the shortening begins to melt and the sugar dissolves. Once slightly cooled, add the beaten egg and the activated yeast mixture. Stir well to combine.
Step 3: Add the Flour
Gradually add the flour, one cup at a time, mixing after each addition. The dough should become soft but not sticky. Once all flour is incorporated, transfer it to a lightly floured surface and knead for about 5 minutes, until smooth and elastic.
Step 4: First Rise
Place the kneaded dough into a large greased bowl, turning it once to coat all sides with oil. Cover with plastic wrap or a clean kitchen towel and let rise in a warm place until doubled in size, about 1½ to 2 hours.
Step 5: Refrigerate the Dough
After the first rise, punch down the dough to release air bubbles. Cover tightly and refrigerate for at least 4 hours or overnight. The dough can be kept in the refrigerator for up to 3 days, making it incredibly convenient for planning ahead.
Step 6: Shape the Rolls
When you’re ready to bake, remove the dough from the refrigerator and allow it to warm for about 30–45 minutes. Pinch off small pieces and shape them into balls about the size of a golf ball. Dip each ball into melted butter or margarine and place them in a greased baking pan, spacing slightly apart to allow room for rising.
Step 7: Second Rise
Cover the rolls lightly with a towel and let them rise in a warm area until doubled in size again, about 45 minutes to an hour.
Step 8: Bake to Perfection
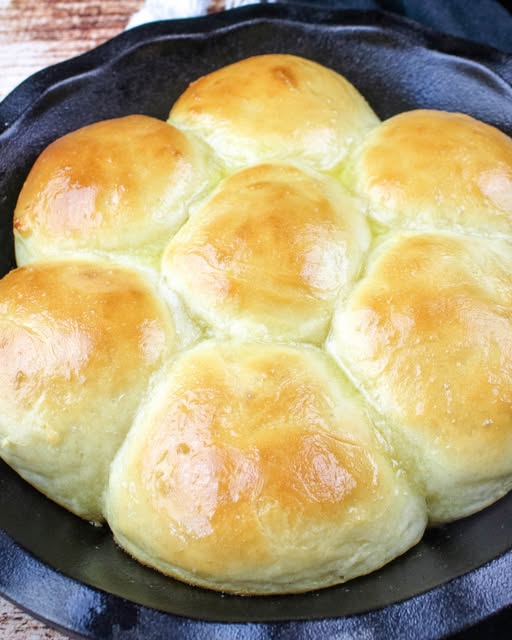
Preheat the oven to 375°F (190°C). Bake the rolls for 15–20 minutes, or until they turn a lovely golden brown on top. Remove from the oven and brush immediately with more melted butter for that irresistible shine and flavor.
Serving Ideas
- Classic Butter Rolls: Serve warm with butter that melts right into the soft, fluffy centers.
- Sweet Option: Brush with honey butter or sprinkle lightly with cinnamon sugar for a sweet twist.
- Savory Touch: Add garlic butter or herbs on top before baking for a fragrant, dinner-ready roll.
- Holiday Favorite: Perfect for Thanksgiving, Christmas, or Easter dinner — these rolls are a staple on festive tables.
Tips for Perfect Refrigerator Rolls
- Mind the Water Temperature – The water should be warm but not hot (about 105°F–110°F). Hot water can kill the yeast.
- Don’t Over-Flour – Too much flour can make your rolls dense. The dough should feel soft and slightly tacky but not sticky.
- Refrigeration Helps Flavor – The longer the dough rests in the fridge, the better the flavor develops.
- Use Quality Flour – Southern flours like White Lily or Martha White produce lighter, more tender rolls.
- Brush Generously with Butter – That’s what gives them their signature rich taste and golden sheen.
Why You’ll Love These Rolls
- Convenience: The make-ahead dough is perfect for busy cooks.
- Versatility: Shape them into cloverleaf rolls, knots, or even mini sandwich buns.
- Texture: Soft, fluffy, and slightly sweet — the ultimate comfort bread.
- Family Tradition: They taste like something right out of your grandmother’s kitchen.
Storing and Reheating
These rolls keep beautifully. Once cooled, store in an airtight container at room temperature for up to 3 days. To reheat, wrap in foil and warm in a 300°F oven for 10 minutes. You can also freeze the baked rolls — simply thaw and reheat when needed.
If freezing unbaked dough, shape into rolls and freeze on a baking sheet. Once frozen solid, transfer to a freezer bag. When ready to bake, thaw overnight in the fridge and allow to rise before baking.
The Joy of Homemade Rolls
Mother’s Refrigerator Rolls are more than just bread — they’re a comforting piece of family history. They remind us of shared meals, laughter at the table, and the simple pleasure of warm, homemade goodness. With this recipe, you can carry that tradition forward and make every meal a little more special.
Soft, buttery, and golden — these rolls will forever hold a place at your table and in your heart.