Introduction
No-Knead Artisan Dutch Oven Bread is one of the simplest yet most rewarding recipes any home baker can master. With just a handful of basic ingredients—flour, yeast, salt, and water—you can create a rustic loaf that rivals bakery-quality bread. The magic of this recipe lies in time, not effort. Instead of kneading, the dough develops its structure and flavor through slow fermentation, which means the yeast does the hard work while you simply wait.
This technique produces a beautiful crackling crust, an airy crumb, and a deeply developed flavor that comes from long hydration. Baking the dough inside a covered Dutch oven traps steam, which helps recreate the professional oven effect that gives artisan bread its iconic crispy shell. The result is a loaf that’s golden, crusty on the outside, and wonderfully soft and chewy on the inside.
Whether served with salted butter, dipped in olive oil, or used to elevate sandwiches, this bread brings freshness and comfort to any meal. Even better—it’s almost impossible to get wrong, making it an ideal recipe for beginners and seasoned bakers alike.
Ingredients
- 3 cups all-purpose flour (bread flour also works)
- 1 teaspoon active dry yeast
- 1 ½ teaspoons salt
- 1 ½ cups warm water
Optional Add-ins:
- Sesame seeds
- Herbs
- Garlic
- Olives
Instructions
Mix the Dough
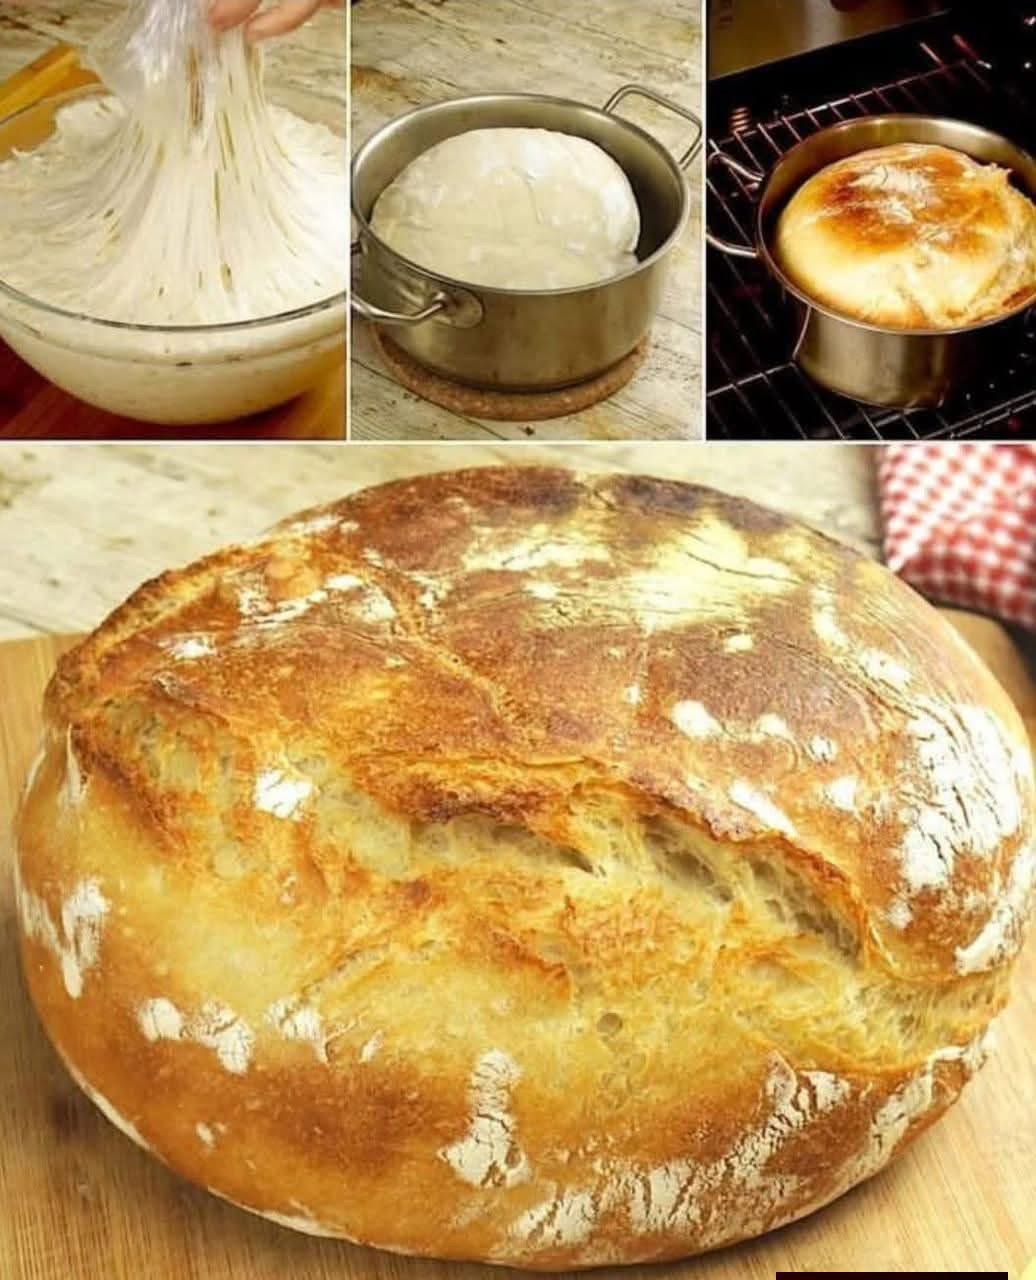
In a large bowl, whisk together the flour, salt, and yeast. Pour in the warm water and mix with a spoon or silicone spatula until no dry flour remains. The dough will be sticky and loose—that is exactly how it should look. Cover the bowl tightly with plastic wrap or a clean towel.
Slow Rise
Set the dough aside at room temperature and allow it to rise for 12–18 hours. During this resting time, the yeast slowly ferments the dough, creating flavor, elasticity, and bubbles. When ready, the dough should be dotted with air pockets and look significantly expanded.
Shape the Dough
Dust your hands and a work surface with flour. Gently scrape the dough out of the bowl—it will feel stretchy and airy. Fold the dough a few times to create surface tension and tuck the edges underneath to form a round shape. Do not knead, as over-working the dough can deflate it. Set the dough on a floured parchment sheet or directly into a bowl lightly sprinkled with flour and cover again for 30 minutes.
Preheat the Dutch Oven
Place a Dutch oven, including the lid, into your oven and preheat to 450°F (230°C). Heating the pot ahead of time creates a hot environment similar to a hearth oven.
Bake
Carefully remove the hot Dutch oven from the oven. Gently transfer the dough into the pot—parchment makes this step easy and safe. Cover with the lid and bake for 30 minutes. Removing the lid afterward allows the crust to fully brown and crackle, so bake for an additional 10–15 minutes uncovered until the loaf turns deep golden brown.
Cool
Remove the bread and place it on a wire rack to cool before slicing. Allowing it to rest helps the interior set and makes cutting cleaner, though the crackling sounds from the cooling crust may tempt you to dig in early.
Serving Suggestions
This bread is versatile enough for almost anything—toast and butter, breakfast sandwiches, soup companions, charcuterie boards, or bruschetta. Slice it warm for softness or toast it for crunch.
Storage
Store leftovers wrapped in fabric or paper to maintain the crust’s crispness. Avoid sealing in plastic unless you prefer a softer exterior. The loaf keeps well for up to three days and freezes beautifully.
With almost no effort and only a few pantry staples, you can enjoy the aroma and flavor of freshly baked artisan bread right at home. From the first crackle to the last crumb, there’s nothing quite like homemade No-Knead Dutch Oven Bread! 🍞✨