Easy Eco-Friendly Craft with Natural Materials
Creating bioplastic suncatchers is a fun, creative, and eco-friendly way to decorate your home while reducing plastic waste. These beautiful handmade decorations use simple ingredients like cornstarch, water, and vinegar to create a biodegradable material that can be shaped and customized with flowers, leaves, or colors.
This guide will show you how to make DIY bioplastic suncatchers step by step, using affordable materials and easy techniques. Perfect for kids, beginners, and craft lovers, this project combines sustainability with creativity.
What Are Bioplastic Suncatchers?
Bioplastic suncatchers are decorative pieces made from natural, biodegradable materials instead of traditional plastic. When placed near sunlight, they allow light to pass through, creating colorful reflections and enhancing the beauty of your space.
Unlike synthetic plastic, bioplastic is environmentally friendly and breaks down naturally over time.
Benefits of Making Bioplastic Crafts
Choosing bioplastic crafts offers many advantages.
Eco-Friendly Benefits
- Reduces plastic waste
- Uses natural ingredients
- Biodegradable and sustainable
- Safe for children and home use
Creative Benefits
- Fully customizable designs
- Great for DIY home decor
- Perfect for gifts and handmade projects
Materials You Will Need
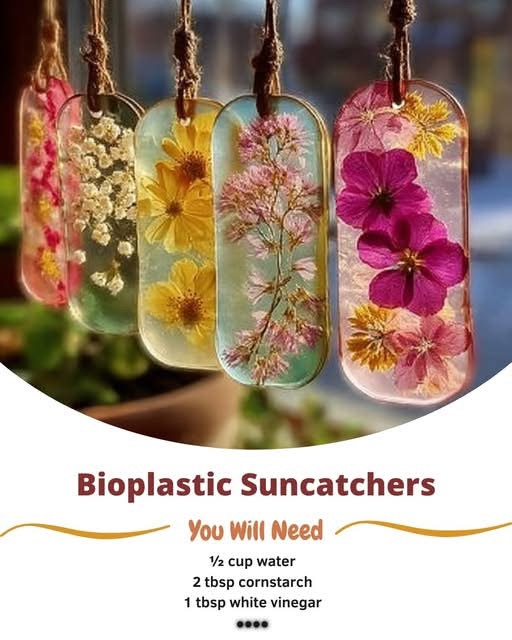
To make bioplastic suncatchers, you only need a few basic ingredients.
Basic Ingredients
- 1/2 cup water
- 2 tablespoons cornstarch
- 1 tablespoon white vinegar
Optional Decorative Materials
- Dried flowers
- Fresh leaves
- Food coloring
- Glitter (optional)
- Essential oils (for fragrance)
Tools Needed
- Small saucepan
- Spoon or spatula
- Silicone mold or flat surface
- String or twine (for hanging)
Step-by-Step Instructions
Follow these simple steps to create your own bioplastic suncatchers.
Step 1: Mix the Ingredients
In a saucepan, combine:
- Water
- Cornstarch
- Vinegar
Stir well until the mixture becomes smooth and lump-free.
Step 2: Heat the Mixture
Place the saucepan over low to medium heat.
Stir continuously until the mixture thickens and turns into a gel-like consistency.
This usually takes about 3–5 minutes.
Step 3: Add Color and Decorations
Once the mixture thickens, remove it from heat.
Add:
- Food coloring (if desired)
- Dried flowers or leaves
Mix gently to avoid damaging decorations.
Step 4: Shape the Suncatchers
Pour the mixture into molds or spread it evenly on a flat surface.
Flatten gently using a spoon.
Make small holes at the top if you plan to hang them later.
Step 5: Let It Dry
Allow the bioplastic to dry completely.
Drying time can vary between 24–48 hours depending on thickness and humidity.
Step 6: Remove and Hang
Once fully dry, carefully remove from the mold.
Attach a string or twine through the hole.
Hang near a window to enjoy beautiful light reflections.
Tips for Best Results
To achieve the best quality suncatchers, follow these tips.
Use Low Heat
High heat can cause lumps or uneven texture.
Stir Constantly
Continuous stirring prevents clumping.
Use Thin Layers
Thin layers dry faster and look more transparent.
Choose Flat Decorations
Flat flowers and leaves work best for smooth results.
Creative Design Ideas
You can experiment with many styles and designs.
Floral Suncatchers
Use colorful dried flowers for a natural look.
Colorful Patterns
Add multiple colors for a stained-glass effect.
Minimalist Style
Use clear bioplastic with simple leaf designs.
Layered Effects
Create layers for a unique 3D look.
Educational Benefits for Kids
This project is also great for children.
Learning Opportunities
- Understanding eco-friendly materials
- Developing creativity
- Improving motor skills
- Learning basic science concepts
It’s a fun and educational activity for families.
How Long Do Bioplastic Suncatchers Last?
Bioplastic is biodegradable, so it won’t last forever.
Lifespan
- Indoors: several months
- Away from moisture: longer durability
To extend lifespan, keep them dry and away from direct water.
Storage Tips
If not in use, store suncatchers in a cool, dry place.
Avoid humid environments to prevent softening.
Why Choose Bioplastic Over Traditional Plastic?
Bioplastic is becoming popular due to its environmental benefits.
Key Advantages
- Reduces environmental impact
- Non-toxic and safe
- Easy to make at home
- Affordable and accessible
It’s a simple way to contribute to a greener planet.
Common Mistakes to Avoid
Avoid these mistakes for better results.
Overheating the Mixture
This can ruin the texture.
Not Stirring Enough
Leads to lumps in the material.
Using Too Much Thickness
Thick layers take longer to dry and may not become transparent.
Using Wet Decorations
Always use dry materials to prevent mold.
Perfect for Home Decor and Gifts
Bioplastic suncatchers are ideal for:
- Window decoration
- Handmade gifts
- Craft projects
- Seasonal decor
They add a natural and artistic touch to any space.
Conclusion
DIY bioplastic suncatchers are a beautiful, eco-friendly craft that combines creativity with sustainability. Using simple ingredients like cornstarch, water, and vinegar, you can create stunning decorations that brighten your home while reducing plastic waste.
This easy project is perfect for beginners, families, and anyone looking to explore sustainable crafts. With endless design possibilities, you can personalize each suncatcher to match your style.
Start making your own bioplastic suncatchers today and enjoy a creative, environmentally friendly experience that brings both beauty and purpose into your home.