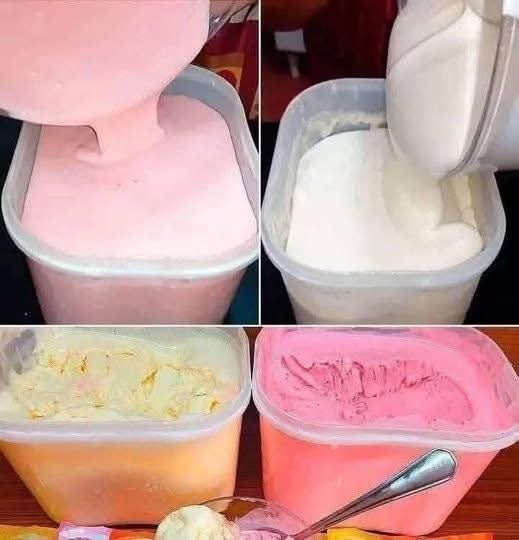
This homemade no-churn ice cream is the easiest way to make rich, creamy ice cream at home—no machine needed. The photo shows two classic flavors made from one simple base: smooth vanilla and sweet strawberry (pink). With just a few ingredients and a mixer, you can whip, fold, freeze, and scoop a dessert that tastes like a creamy store-bought tub—but fresher and customizable.
No-churn ice cream works because whipped cream adds air (for softness), while sweetened condensed milk keeps the mixture from freezing into a solid ice block. The result is a scoopable, silky texture even after freezing overnight. Once you learn the base, you can create dozens of flavors using fruit, cookies, chocolate, caramel, or nuts.
Why You’ll Love This No-Churn Ice Cream
- No ice cream maker required
- Super creamy texture with simple ingredients
- One base = many flavors
- Perfect for beginners and quick desserts
- Freezer-friendly for make-ahead treats
Ingredients
Base (vanilla no-churn ice cream)
- 2 cups (480 ml) heavy whipping cream, very cold
- 1 can (14 oz / 397 g) sweetened condensed milk
- 2 tsp vanilla extract
- Pinch of salt
Strawberry version (pink)
- 1 cup strawberries (fresh or frozen)
- 2–3 tbsp sugar (adjust to taste)
- 1 tsp lemon juice (optional, brightens flavor)
- Optional: a drop of pink food coloring for stronger color
Optional mix-ins:
- chocolate chips, crushed cookies, caramel swirl, chopped nuts, sprinkles
How to Make No-Churn Ice Cream (Step-by-Step)
- Chill your tools
For the best whip, chill your mixing bowl and beaters in the freezer for 10 minutes. - Whip the cream
Pour cold heavy cream into the bowl and whip until stiff peaks form. The cream should be thick and hold its shape. - Mix the base
In another bowl, stir sweetened condensed milk with vanilla and a pinch of salt. - Fold gently
Add whipped cream to the condensed milk mixture in two batches. Fold slowly with a spatula until smooth and airy. Do not stir hard—folding keeps the ice cream light. - Freeze
Pour into a container, smooth the top, cover tightly, and freeze at least 6 hours (overnight for best texture).
Strawberry No-Churn Ice Cream (Pink Layer)
- Make a quick strawberry puree
Blend strawberries with sugar and lemon juice. For a thicker puree, simmer it 5–8 minutes then cool completely (this reduces extra water and improves texture). - Add to the base
Fold strawberry puree into half of the ice cream base until pink and evenly mixed. You can also swirl it in for a marbled look. - Layer (optional like the photo)
Pour vanilla into one container and strawberry into another, or layer both flavors in one container. Freeze.
Tips for Creamy, Scoopable Ice Cream
- Use cold heavy cream so it whips properly.
- Do not use evaporated milk (it won’t whip like heavy cream).
- Cool fruit puree completely before mixing so it doesn’t melt the whipped cream.
- Thicker fruit = better texture (cook puree briefly for best results).
- For cleaner scoops, let the container sit at room temperature 5 minutes before serving.
Flavor Ideas (Using the Same Base)
- Cookies & cream (crushed cookies folded in)
- Chocolate (add cocoa + melted chocolate)
- Mango (thick mango puree)
- Pistachio (chopped pistachios + almond extract)
- Caramel swirl (caramel ribbon + sea salt)
- Banana (banana puree + vanilla wafers)
Storage
Keep no-churn ice cream covered tightly in the freezer for up to 2 weeks for best freshness. Place plastic wrap directly on the surface to reduce ice crystals.
Keywords: no churn ice cream, homemade ice cream without machine, vanilla no churn ice cream, strawberry no churn ice cream, easy ice cream recipe, condensed milk ice cream, cream ice cream base, homemade frozen dessert.