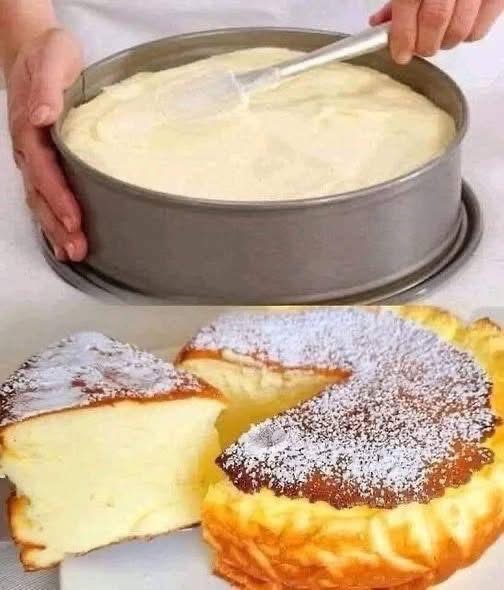
This cheesecake is soft, smooth, and light — a perfect balance between a custard and a classic baked cheesecake. The texture is airy, almost like a cloud, yet it still holds its shape beautifully when sliced. It has a gentle sweetness, a creamy interior, and a slightly browned top that adds a light caramel note. When served chilled, it’s refreshing and delicate. When served slightly warm, it’s soft and comforting.
This version doesn’t require any complicated water baths or special equipment beyond a springform pan and a hand mixer. The process is simple but benefits from patience and gentle handling.
Ingredients
For the Cheesecake Batter:
- 500 grams (about 2 cups) cream cheese, softened
- 1 cup granulated sugar
- 4 large eggs
- 1 cup sour cream or plain yogurt
- 1 cup heavy cream
- 3 tablespoons all-purpose flour
- 1 teaspoon vanilla extract
- 1 tablespoon lemon juice
- 1 teaspoon grated lemon zest (optional)
- A pinch of salt
For Dusting (optional):
- Powdered sugar for serving
Instructions
Step 1: Prepare the pan
Use a 9-inch springform pan. Lightly butter the bottom and sides, then line the bottom with parchment paper. This helps the cheesecake release easily after baking. If your pan isn’t leakproof, wrap the outside with foil to prevent any batter from escaping during baking.
Preheat your oven to 325°F (160°C). The moderate heat helps the cheesecake cook evenly without cracking or browning too quickly.
Step 2: Prepare the cream cheese mixture
Place the softened cream cheese in a large mixing bowl. Beat it using an electric hand mixer or stand mixer on medium speed until smooth and free of lumps. This step is important; the cream cheese must be completely smooth before adding other ingredients to ensure a silky texture later.
Once the cheese is smooth, add the granulated sugar gradually. Continue mixing until the sugar is fully incorporated and the mixture becomes creamy and glossy. Scrape down the sides of the bowl as needed to make sure everything is evenly mixed.
Step 3: Add eggs
Add the eggs one at a time. Beat each egg just until it’s blended in before adding the next. Overbeating can introduce too much air, which might cause cracks later. The mixture should look smooth, thick, and slightly shiny after all four eggs are added.
Step 4: Add the remaining ingredients
Now add the sour cream (or yogurt), heavy cream, vanilla extract, lemon juice, and lemon zest if using. Mix gently until everything is combined. The batter should be smooth and pourable, not stiff. Finally, add the flour and a pinch of salt. Mix just enough to incorporate — do not overmix. The flour helps the cheesecake set without being dense.
Step 5: Pour and smooth
Pour the batter into the prepared pan. Use a spatula to spread the surface evenly. Tap the pan lightly on the counter a few times to remove any large air bubbles trapped inside.
Step 6: Bake
Place the cheesecake in the center of the preheated oven and bake for 55 to 65 minutes. The baking time can vary slightly depending on your oven. The cheesecake should puff up slightly and turn a gentle golden brown on top. The center should still have a slight jiggle when you gently shake the pan — it will firm up as it cools.
If the top starts to brown too quickly, you can loosely cover it with a piece of foil during the last 15 minutes of baking.
Step 7: Cool gradually
Turn off the oven and crack the door open slightly. Let the cheesecake sit in the warm oven for about 30 minutes. This helps it cool down slowly and prevents cracks from forming due to sudden temperature changes.
After 30 minutes, remove the cheesecake from the oven and place it on a wire rack. Let it cool completely at room temperature. Once it has cooled, refrigerate it for at least 4 hours, or overnight if possible. Chilling helps the texture firm up and makes slicing easier.
Step 8: Serve
Before serving, run a thin knife around the edge of the pan to loosen the sides, then release the springform. Transfer the cheesecake to a serving plate. Dust lightly with powdered sugar before serving.
Slice with a sharp knife, wiping the blade clean between cuts for neat slices. The inside should be creamy and smooth, with a slight bounce to the texture.
Notes and Tips
- Cream cheese: Make sure it’s fully softened before mixing. Cold cream cheese can lead to lumps.
- Flour: Adds structure but keeps the texture light. Do not skip it.
- Lemon: The juice and zest are optional but add brightness and balance to the sweetness.
- Cooling: Avoid rushing the cooling process. Sudden temperature changes can make the surface crack.
- Storage: Keep refrigerated, covered, for up to five days. It can also be frozen for up to one month — wrap slices individually for convenience.
- Serving idea: Top with fresh berries, fruit sauce, or a drizzle of honey for a nice contrast.
Optional Variation: Lighter Japanese-Style Texture
If you want an even fluffier, soufflé-like cheesecake (similar to Japanese cotton cheesecake), you can separate the eggs and beat the whites separately:
- Separate the eggs into yolks and whites.
- Add the yolks to the cream cheese mixture as described above.
- Beat the egg whites with a clean whisk until soft peaks form.
- Gently fold the whipped whites into the batter with a spatula, using slow, circular motions until just combined.
- Pour into the pan and bake at a slightly lower temperature (around 300°F or 150°C) for about 60–70 minutes.
This version will rise higher in the oven and may shrink slightly as it cools, creating a soft, pillow-like surface with a light golden crust.
Texture and Taste
When done right, this cheesecake should be smooth and moist, not dense. The outer layer forms a gentle golden color while the interior stays pale and creamy. The taste is light and balanced — not overly sweet, with a mild tang from the cream cheese and lemon. The flour gives the cake just enough body to hold its shape, while the heavy cream adds richness. The combination of texture and flavor makes it satisfying without being heavy.
This cake can be served plain, with powdered sugar as shown in the photo, or paired with light toppings like whipped cream or fruit. Because the flavor is mild, it complements fresh berries very well.
Serving and Storage Suggestions
To serve, take the cheesecake out of the refrigerator about 15 minutes before slicing so it softens slightly. Use a long, thin knife and wipe it clean between each slice. If serving for guests, add a light dusting of powdered sugar right before bringing it to the table — this keeps it looking fresh.
Leftover cheesecake can be stored covered in the refrigerator. It keeps its texture for several days without drying out. If you prefer a chilled, denser texture, serve it straight from the fridge. If you like it creamier, let it rest at room temperature for a short while before serving.
For longer storage, wrap individual slices in plastic wrap and freeze them. They can be thawed overnight in the refrigerator and enjoyed later with no loss of flavor or texture.
Final Thoughts
This fluffy baked cheesecake is one of those recipes that feels luxurious but is surprisingly simple to make. The main secret lies in not rushing — soft cream cheese, gentle mixing, slow cooling. It’s a dessert that looks elegant yet requires only basic ingredients. The golden top and smooth center make it beautiful enough for any special occasion but still simple enough for everyday baking.
Once cooled and dusted with powdered sugar, the surface looks soft and slightly wavy, a sign of the cake’s delicate structure. Every bite is light and creamy, melting easily in the mouth. Whether served plain or with fruit, it delivers a calm, comforting flavor that appeals to nearly everyone.